

We’re pleased to offer all customers an exclusive 5% discount on every case of Sanair and Puresan...
The Challenge
Many washroom cleaner and deodorising dosing systems are designed to inject solution directly into a toilet or urinal cistern. However, this is not always possible. In some installations, the cistern may be positioned high above head height, concealed behind panels, located within a service void, or otherwise difficult to access safely.
Attempting to connect directly to an inaccessible cistern can increase installation time, complicate future servicing, and make routine maintenance more challenging for engineers.
The Solution: Using a Saddle Clamp
A saddle clamp provides a simple and effective alternative by creating an injection point directly on the water supply pipe coming from the cistern.
Rather than accessing the cistern itself, the saddle clamp is secured around the existing pipework with a small drilled hole. This creates a sealed connection point where cleaning liquid can be inserted, allowing cleaning and deodorising products to be introduced safely into the water supply before it reaches the WC/Urinal.
Using a saddle clamp reduces installation complexity, improves accessibility for ongoing maintenance, and ensures reliable product dosing even in difficult-to-reach installations.
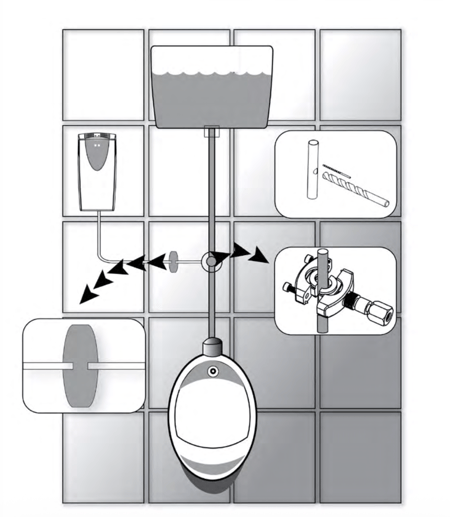
A saddle clamp provides a quick and effective way to create an injection point on a water supply pipe without cutting into the pipework. It is commonly used for cleaner and deodoriser dosing systems, allowing product to be injected directly into the water supply.
What Is a Saddle Clamp and why do I need it?
A saddle clamp is a two-piece fitting that secures around a water supply pipe and connects to a pre-drilled injection point. Once installed, it creates a sealed access point for dosing tubing, allowing cleaning and deodorising products to be introduced into the water system.
This method is typically used when the cistern is positioned high, concealed, or difficult to access for servicing. In these cases, connecting directly to the cistern is not practical.
By using a saddle clamp on the pipework instead, the dispenser can still inject product into the system safely and consistently, while making installation and ongoing maintenance easier for service teams.
Tools Required
- Saddle clamp kit
- 5mm drill bit
- Drill
- Delivery tubing (This can be the silicon tube provided or aluminium tube supplied separately)
- Cleaning cloth
- PPE (gloves and eye protection for drilling)
Step 1: Identify a Suitable Pipe Location
Choose a straight, accessible section of the WC or urinal water supply pipe.
Ensure there is enough clearance for the clamp and future maintenance access.
Step 2: Select the Correct Gasket and Drill the Injection Hole
Before drilling, select the correct gasket size based on the pipe diameter. The saddle clamp will typically include either a 10mm or 15mm gasket.
- Use the 10mm gasket for smaller pipe diameters
- Use the 15mm gasket for larger pipe diameters
Choosing the correct gasket ensures a proper seal between the clamp and the pipe, preventing leaks once the system is pressurised.
Once the correct gasket has been selected, switch off the water supply.
Using a 5mm drill bit, carefully drill a hole into the pipe at the chosen location.
Keep the drill steady and ensure you only drill through one side of the pipe.
Remove any swarf or debris immediately after drilling.
Step 3: Clean the Pipe Area
Wipe the pipe thoroughly to remove moisture, dust, or debris around the drilled area.
A clean surface ensures the saddle clamp and gasket form a secure, leak-free seal.
Step 4: Position the Saddle Clamp
Select the correct gasket size and push it securely into the saddle clamp body, ensuring it is fully seated and fixed in place.
Place each side of the saddle clamp around the pipe, aligning the injection port directly into the drilled hole.
Ensure the clamp sits evenly and squarely on the pipe.
Step 5: Tighten the Clamp
Secure the clamp using the supplied screws.
Tighten evenly to ensure a firm seal around the pipe.
Step 6: Connect the Delivery Tube
Slide the compression nut over the delivery tube that runs from the dispenser and will connect to the saddle clamp.
Next, fit the small rubber tube seal onto the end of the tube.
Insert the tube (with the seal fitted) into the connection port on the saddle clamp, ensuring it is fully seated.
Thread the compression nut onto the saddle clamp by hand to secure the connection.
Finally, use the spanner provided to tighten the nut firmly. This will compress the seal and ensure a watertight, leak-free connection between the saddle clamp and the dispenser delivery line.
Common Installation Mistakes to Avoid
- Installing on a curved or inaccessible pipe section
- Failing to switch off water before drilling
- Drilling through both sides of the pipe
Why Use a Saddle Clamp?
Saddle clamps provide a fast, reliable way to create a dosing point without cutting into existing pipework. When installed correctly, they ensure consistent product delivery and long-term system performance.
Want to know how to install a cleaning and deodoriser dispensers?
Use the links below to visit each product page, where you'll find detailed installation instructions within the dropdown section.

